Difference between revisions of "October 14, 2014"
| Line 3: | Line 3: | ||
<!-- ws:start:WikiTextHeadingRule:0:<h1> --> | <!-- ws:start:WikiTextHeadingRule:0:<h1> --> | ||
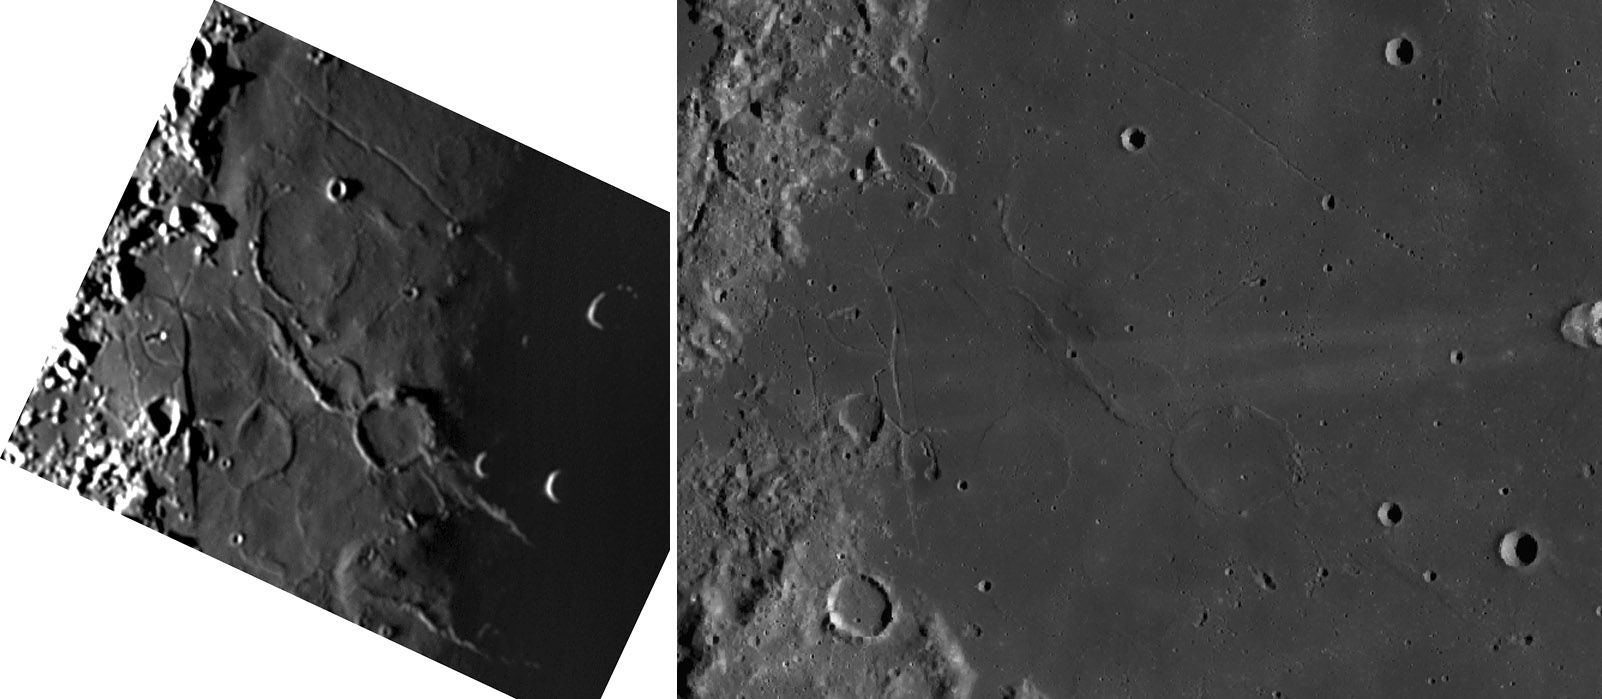
<!-- ws:start:WikiTextLocalImageRule:6:<img src="/file/view/LPOD-Oct14-14.jpg/526334944/LPOD-Oct14-14.jpg" alt="" title="" /> -->[[File:LPOD-Oct14-14.jpg|LPOD-Oct14-14.jpg]]<!-- ws:end:WikiTextLocalImageRule:6 --><br /> | <!-- ws:start:WikiTextLocalImageRule:6:<img src="/file/view/LPOD-Oct14-14.jpg/526334944/LPOD-Oct14-14.jpg" alt="" title="" /> -->[[File:LPOD-Oct14-14.jpg|LPOD-Oct14-14.jpg]]<!-- ws:end:WikiTextLocalImageRule:6 --><br /> | ||
| − | <em>left image by [mailto:thefamily90@hotmail.com | + | <em>left image by [mailto:thefamily90@hotmail.com Jim Phillips]; right from LRO QuickMap</em><br /> |
<br /> | <br /> | ||
| − | The Lunar Reconnaissance Orbiter Cameras provide the best images of the Moon ever obtained. In general. But no single image or mosaic can reveal everything about the Moon. Here is an example where a terrestrial image of low resolution (compared to LRO) shows things that we can't seen otherwise. In Jim's image (left) of the western Mare Fecunditatis, with Messier A on the terminator at top-right, the very low Sun emphasizes the low relief mare ridges and swells, and the rilles and one significant fault cast shadows. The LRO [http://bit.ly/1CfiDjM | + | The Lunar Reconnaissance Orbiter Cameras provide the best images of the Moon ever obtained. In general. But no single image or mosaic can reveal everything about the Moon. Here is an example where a terrestrial image of low resolution (compared to LRO) shows things that we can't seen otherwise. In Jim's image (left) of the western Mare Fecunditatis, with Messier A on the terminator at top-right, the very low Sun emphasizes the low relief mare ridges and swells, and the rilles and one significant fault cast shadows. The LRO [http://bit.ly/1CfiDjM QuickMap] altimetry tool shows that the fault on the right center of Jim's picture is about 140 high. Small rilles associated with a vent (that shows up on the LRO mosaic, right) are visible on both images - I don't know why the rilles are largely on the higher side (uplifted?) of the fault. The QuickMap high Sun [http://bit.ly/1tpJF9j view] shows two dark pyroclastic deposits, one around the the circular vent on the east side of the fault, and the other surrounding three small linear mountains that were probably produced by volcanic eruptions. Two more chains of possible volcanic hills occur near the top-left of Jim's dramatic image. One crosses the Messier Rille and is completely invisible on QuickMap; the other chain is just visible northwest of [http://bit.ly/ZXonD4 Secchi X]. The amount of volcanism in this area is much larger than previously imagined, and the combination of Jim's low-Sun view and the LRO mosaic are both needed to tell the complete story. <br /> |
<br /> | <br /> | ||
| − | <em>[mailto:tychocrater@yahoo.com | + | <em>[mailto:tychocrater@yahoo.com Chuck Wood]</em><br /> |
<br /> | <br /> | ||
<strong>Related Links</strong><br /> | <strong>Related Links</strong><br /> | ||
Revision as of 18:18, 11 January 2015
Two Are Better Than One

left image by Jim Phillips; right from LRO QuickMap
The Lunar Reconnaissance Orbiter Cameras provide the best images of the Moon ever obtained. In general. But no single image or mosaic can reveal everything about the Moon. Here is an example where a terrestrial image of low resolution (compared to LRO) shows things that we can't seen otherwise. In Jim's image (left) of the western Mare Fecunditatis, with Messier A on the terminator at top-right, the very low Sun emphasizes the low relief mare ridges and swells, and the rilles and one significant fault cast shadows. The LRO QuickMap altimetry tool shows that the fault on the right center of Jim's picture is about 140 high. Small rilles associated with a vent (that shows up on the LRO mosaic, right) are visible on both images - I don't know why the rilles are largely on the higher side (uplifted?) of the fault. The QuickMap high Sun view shows two dark pyroclastic deposits, one around the the circular vent on the east side of the fault, and the other surrounding three small linear mountains that were probably produced by volcanic eruptions. Two more chains of possible volcanic hills occur near the top-left of Jim's dramatic image. One crosses the Messier Rille and is completely invisible on QuickMap; the other chain is just visible northwest of Secchi X. The amount of volcanism in this area is much larger than previously imagined, and the combination of Jim's low-Sun view and the LRO mosaic are both needed to tell the complete story.
Chuck Wood
Related Links
21st Century Atlas chart 3.


